The Copper block and item family is one of the largest and most diverse in Minecraft. They have different textures, purposes, and complex mechanics that make them different from all other blocks. Today, we will take a look at all the Copper blocks and items that exist in Minecraft and explain how you can get them as well as how they behave.
All copper items and blocks in Minecraft
Let’s first focus on all of the copper items and blocks in the game, as well as how you can find, obtain, or create them.
1. Copper ore
Copper generates naturally in the form of ores like other precious materials. You’ll find common copper ore and very rarely deepslate copper ore. These ores generate anywhere between Y level -16 and 112 , being found most frequently around Y level 47 and 48.
Copper is found as reasonably sized ore drops in most biomes , but in dripstone caves these drops are much larger and occur more frequently.
Regular copper ores replace stone and its variants, while deepslate copper ores replace deepslate and even tuff blocks – but only on Java Edition. So, deepslate copper ores can generate in deepslate layers, which start appearing around Y level 5 and go up to Y level-16.
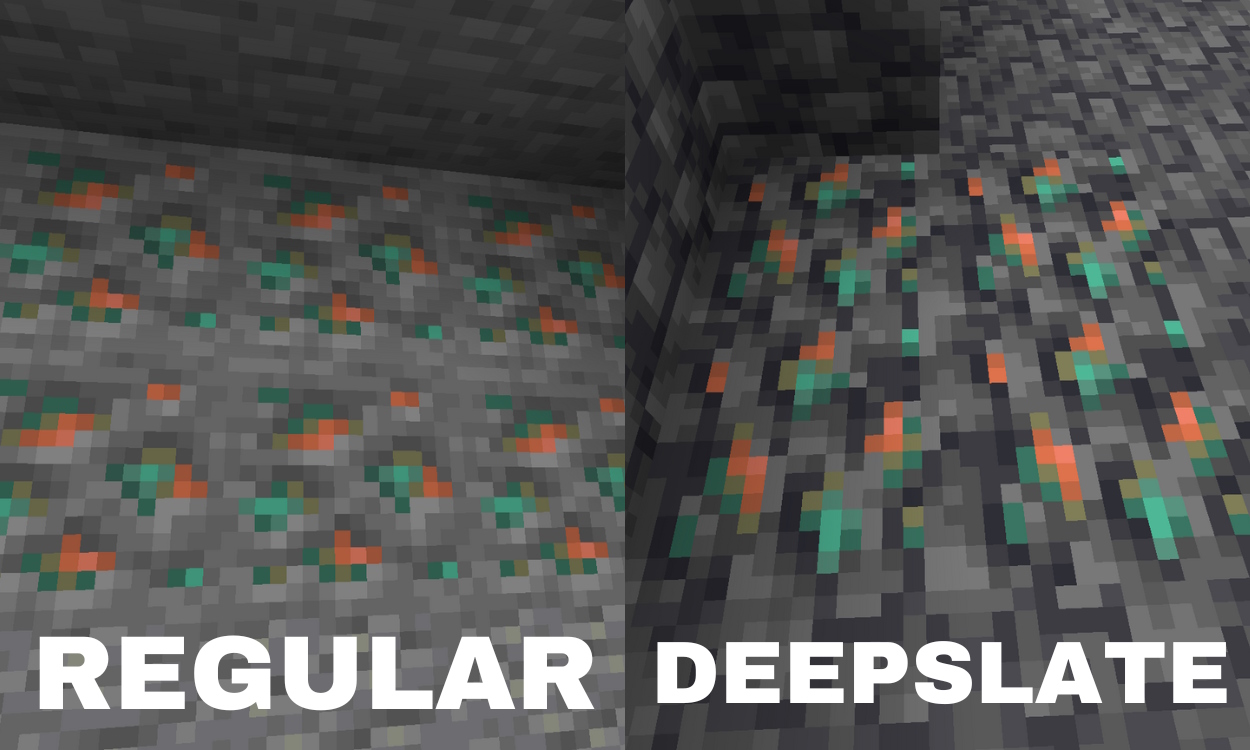
It’s also possible to find a giant copper ore vein above Y level 0. In these special terrain features, copper ore and granite blocks form a giant spiral system with a ton of ores at your disposal. You’ll also occasionally find a unique copper block, which we’ll mention in the next section.
To successfully mine copper ores, you must use at least a stone tier pickaxe. With the Silk Touch Minecraft enchantment , the ores will drop themselves as items, allowing you to transport them to a different location.
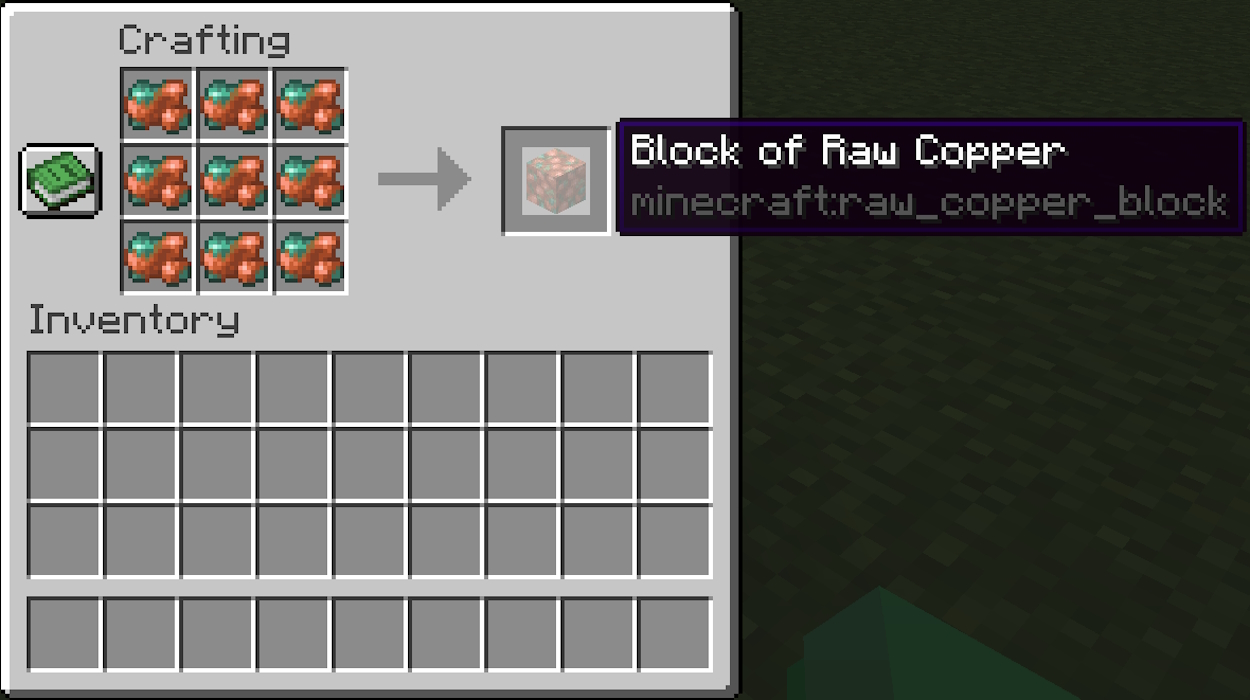
2. Raw Copper
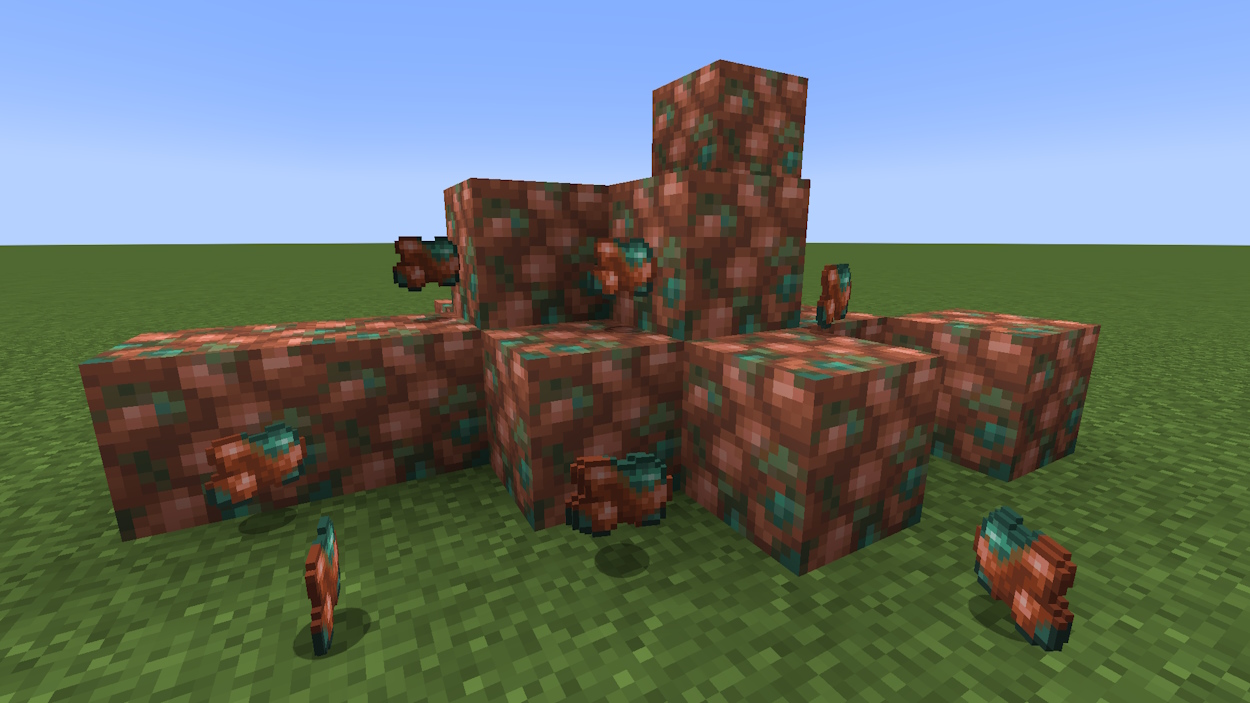
If you break copper ores without silk touch, they will drop up to 5 raw copper. However, with luck mining the ores, one of the best enchantments , you can get up to 20 raw copper with the highest level of this enchantment.
Raw copper items can be smelted or turned into a raw copper block. This block requires 9 pieces of raw copper and can be broken down into its components or used as decoration.
3. Copper ingots
When you smelt raw copper items in a furnace or blast furnace, you will get copper ingots. Smelting copper ores directly also yields copper ingots, but this is not at all recommended since you are limiting the results from the ores to only one ingot.
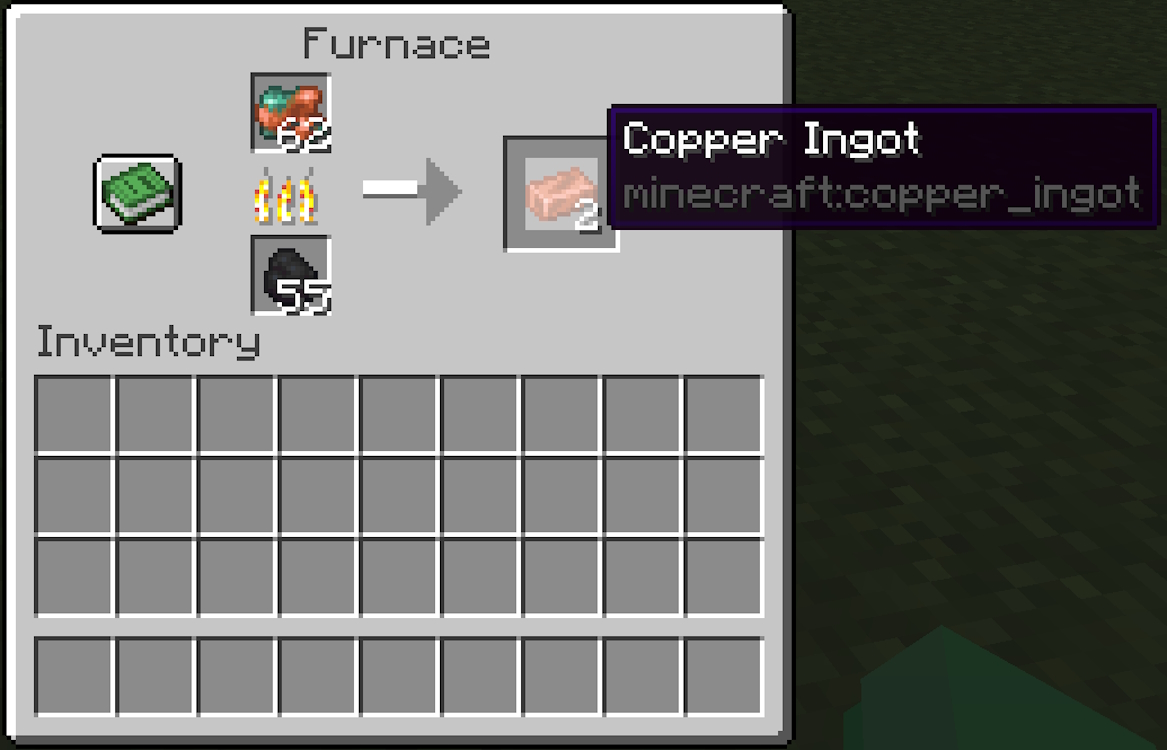
Copper ingots are the processed copper items that are most commonly used. They are part of many craft recipes and are even a smithing material used to make armor trim . An alternative way to obtain these ingots is by killing drowned zombie variants.Related Articles
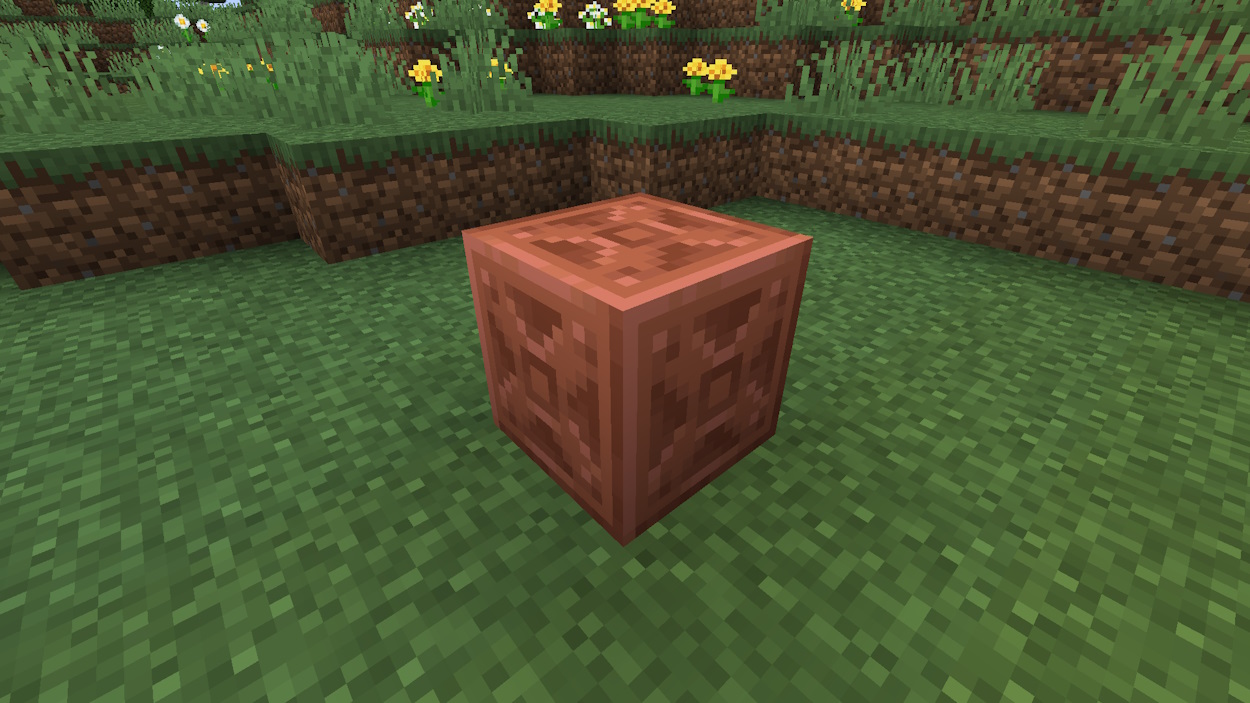
4. Copper block
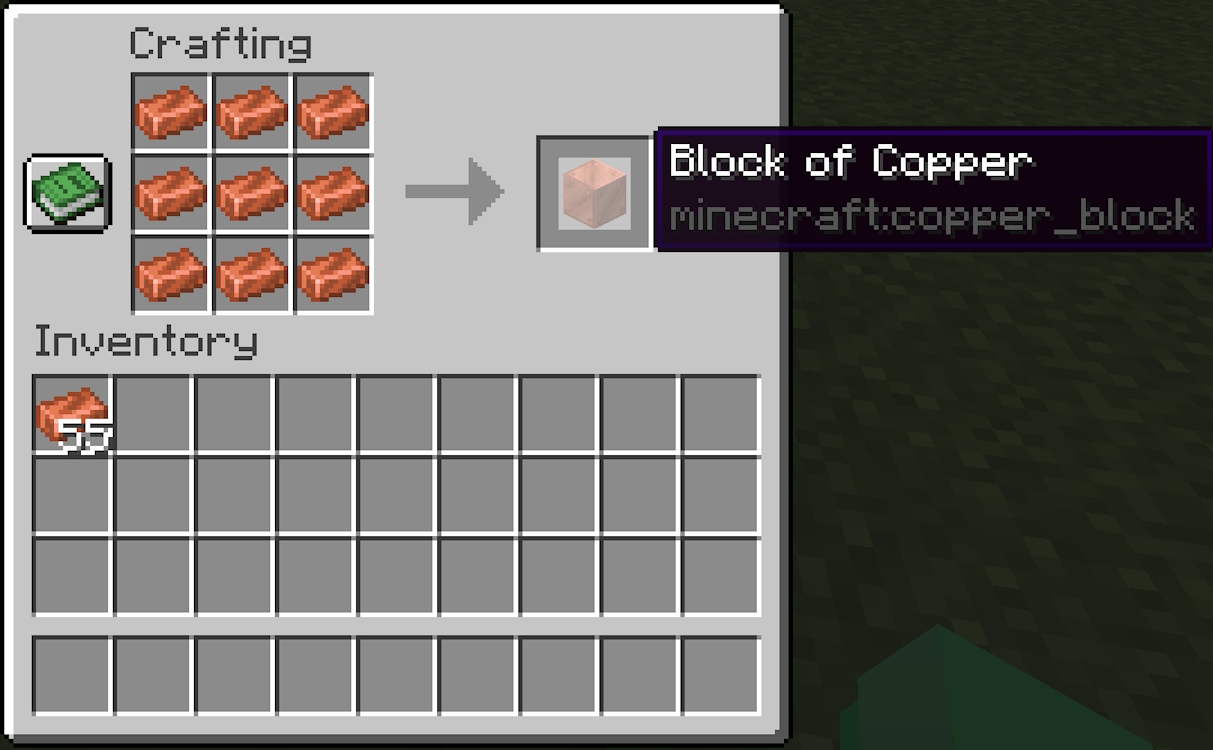
The copper block can be crafted from 9 copper ingots that completely fill the crafting table ‘s grid. It is a storage block, as you can easily break it down into copper ingots. Other than that, its primary use is as a building block that slowly oxidizes over time, causing it to change color.
Oxidation is a unique process that we will discuss further in this article. Copper Block is also a crafting material for cut copper blocks.
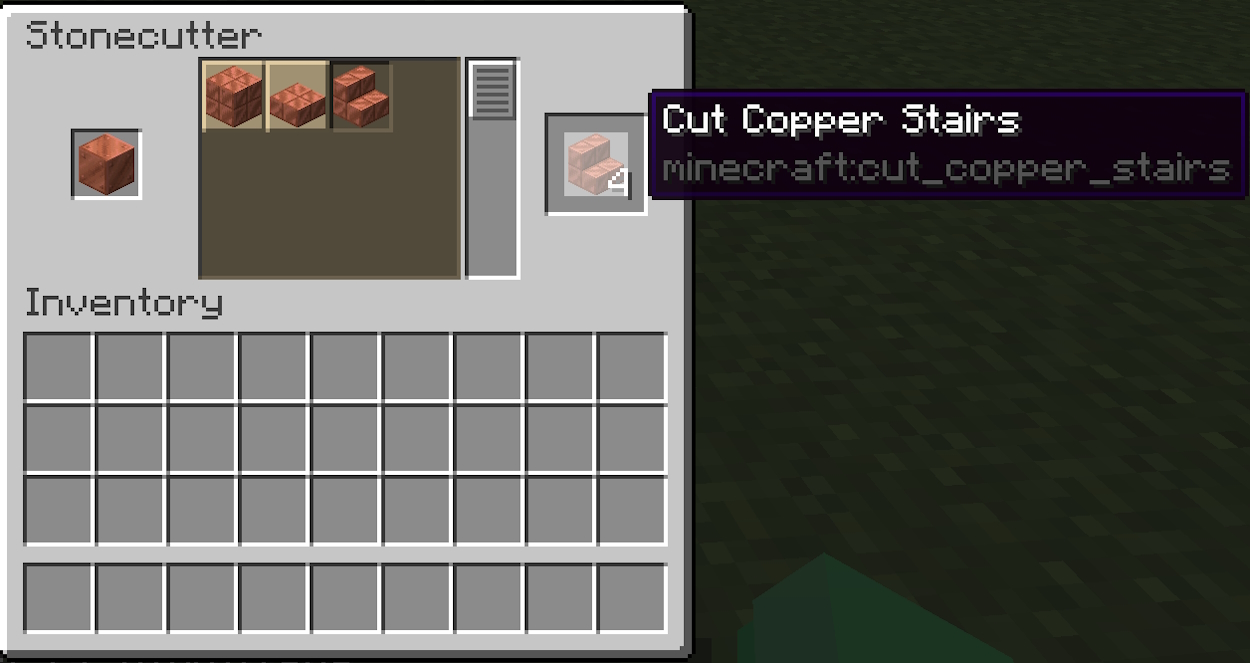
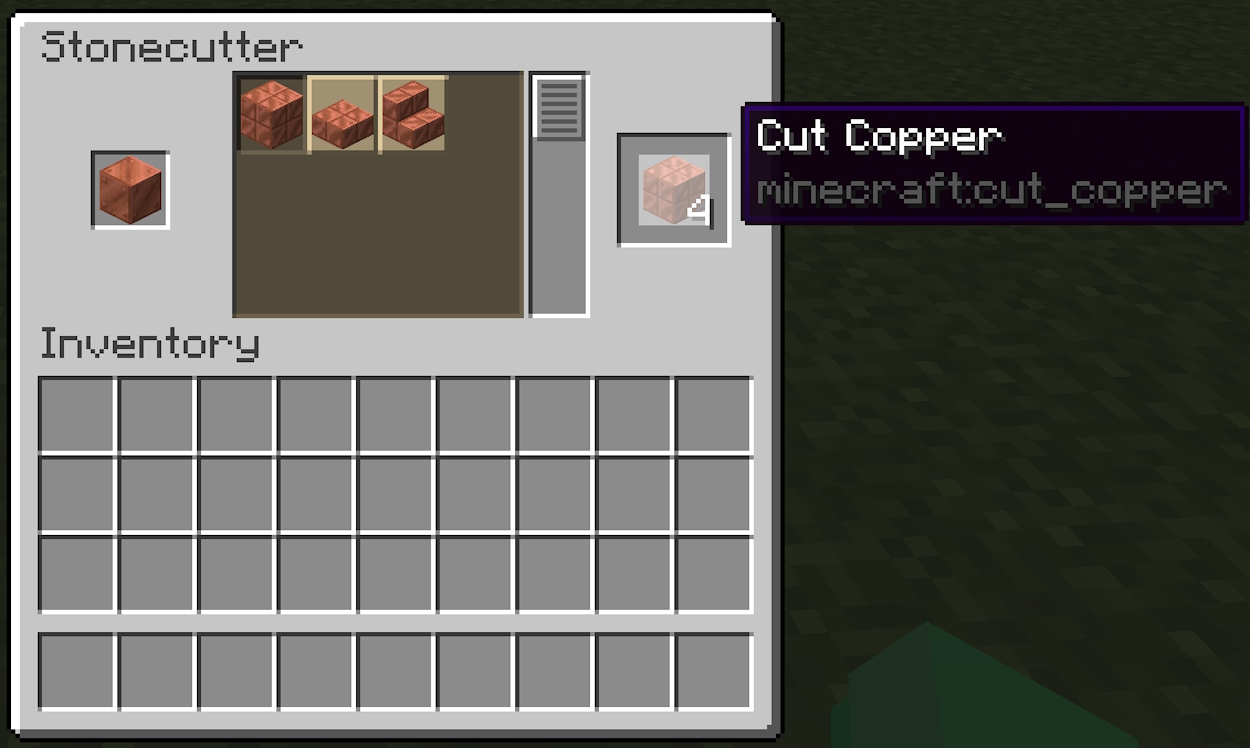
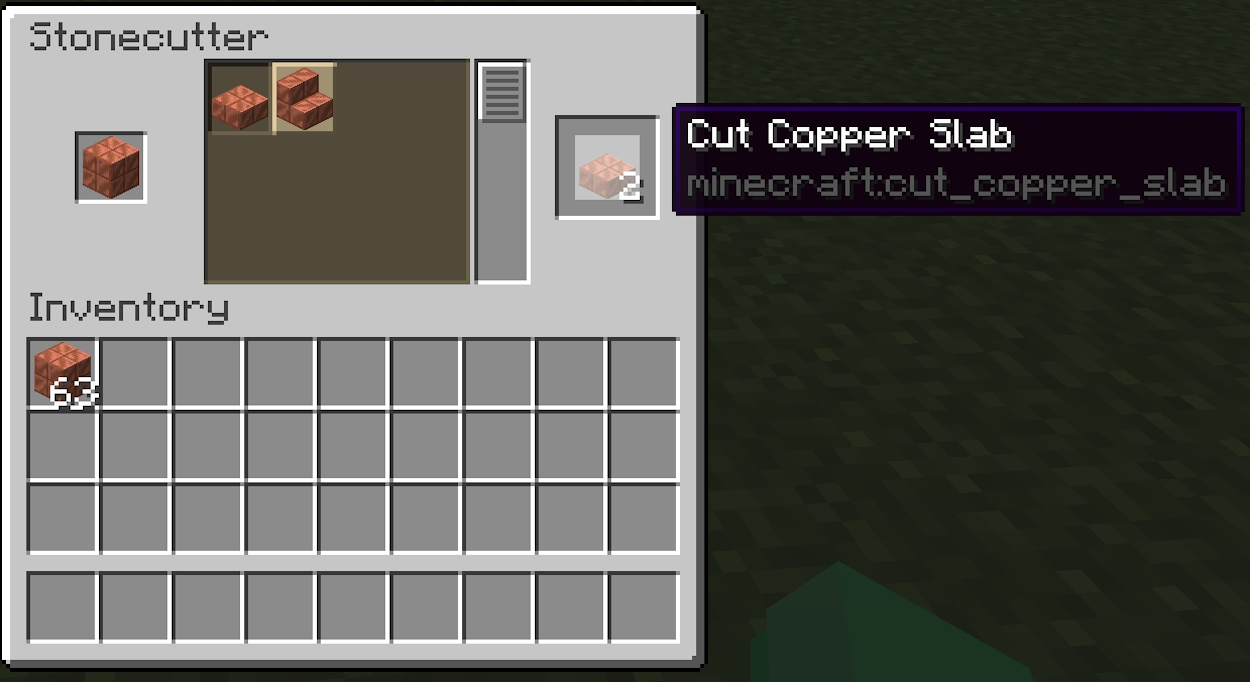
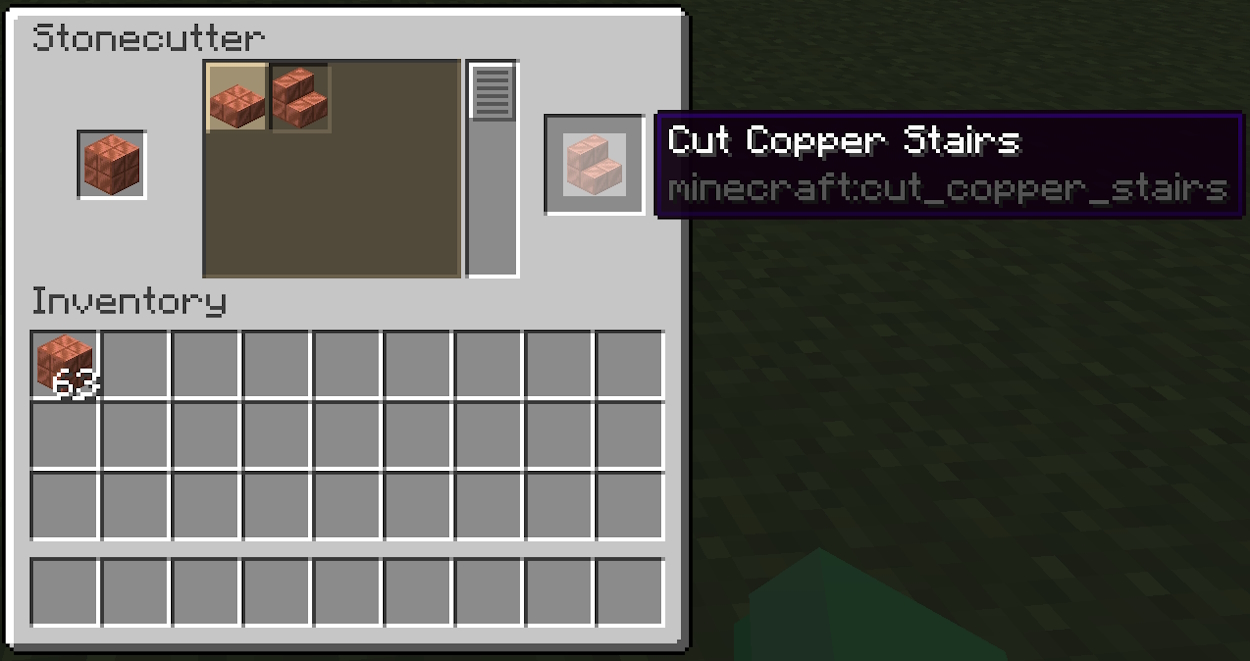
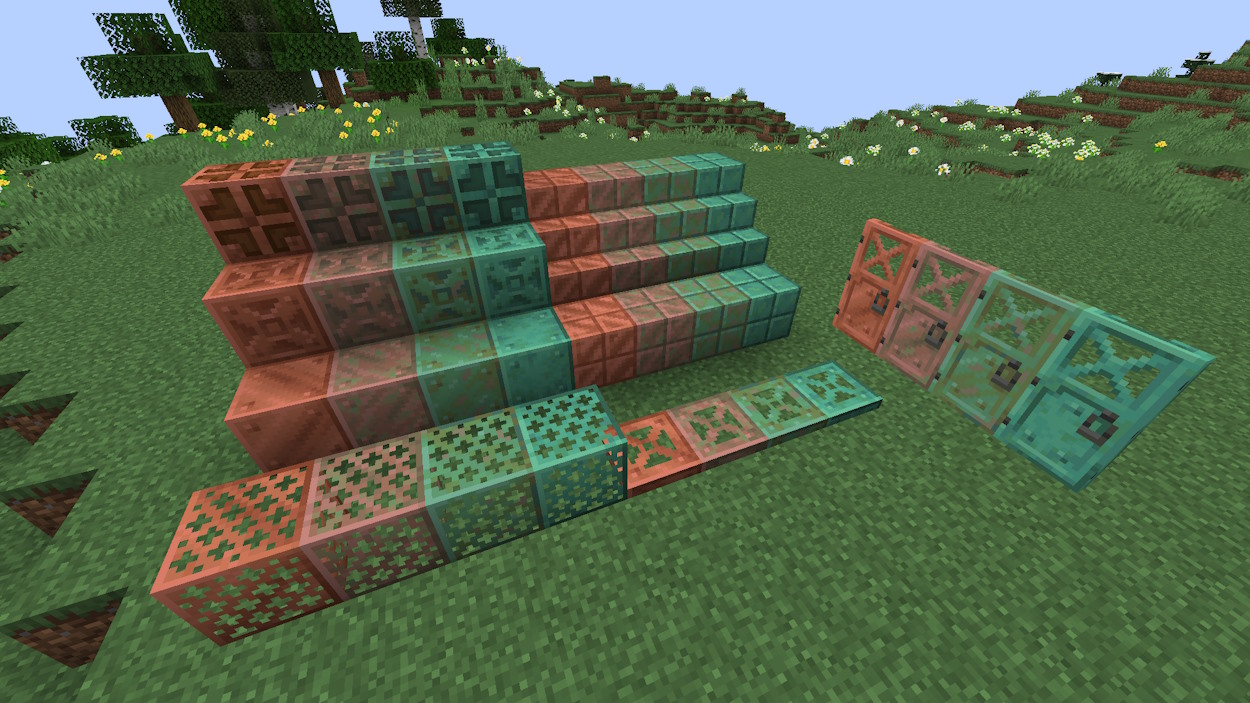
5. Cut the copper blocks
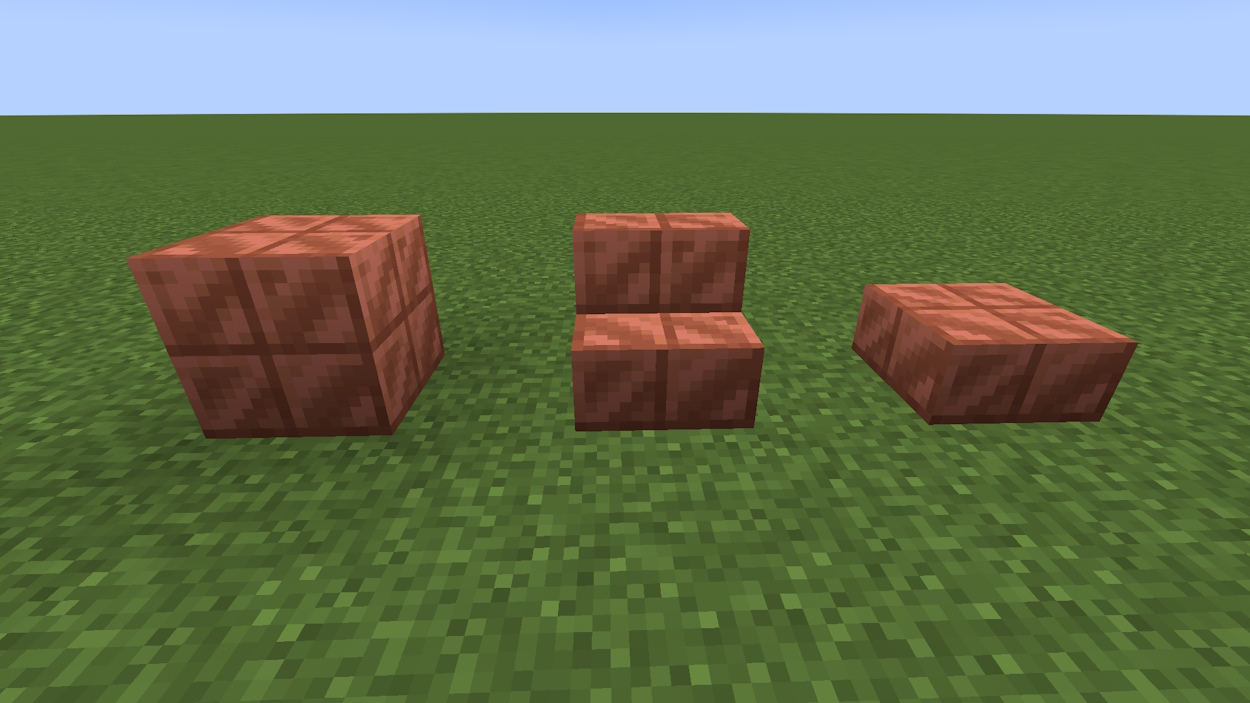
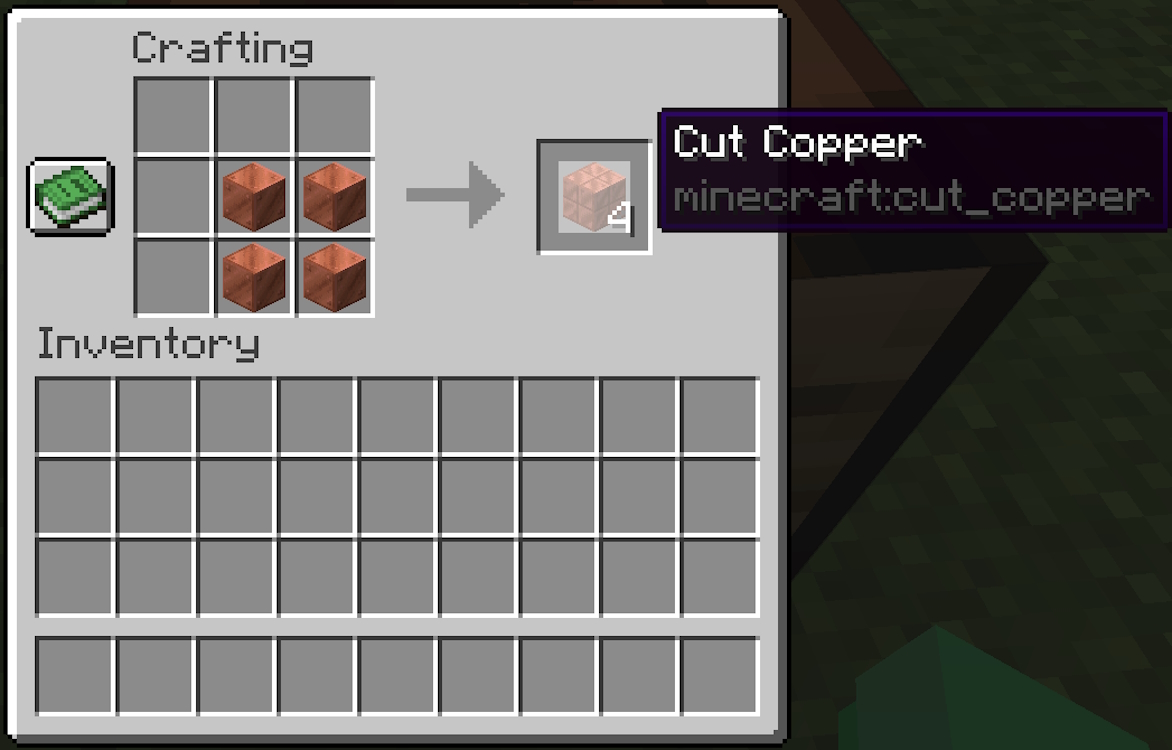
Cut copper blocks include whole cut copper blocks, cut copper stairs, and cut copper slabs. You can craft whole cut copper blocks using four regular copper blocks. Then, you can craft stairs and slabs from whole cut copper blocks in the crafting grid.
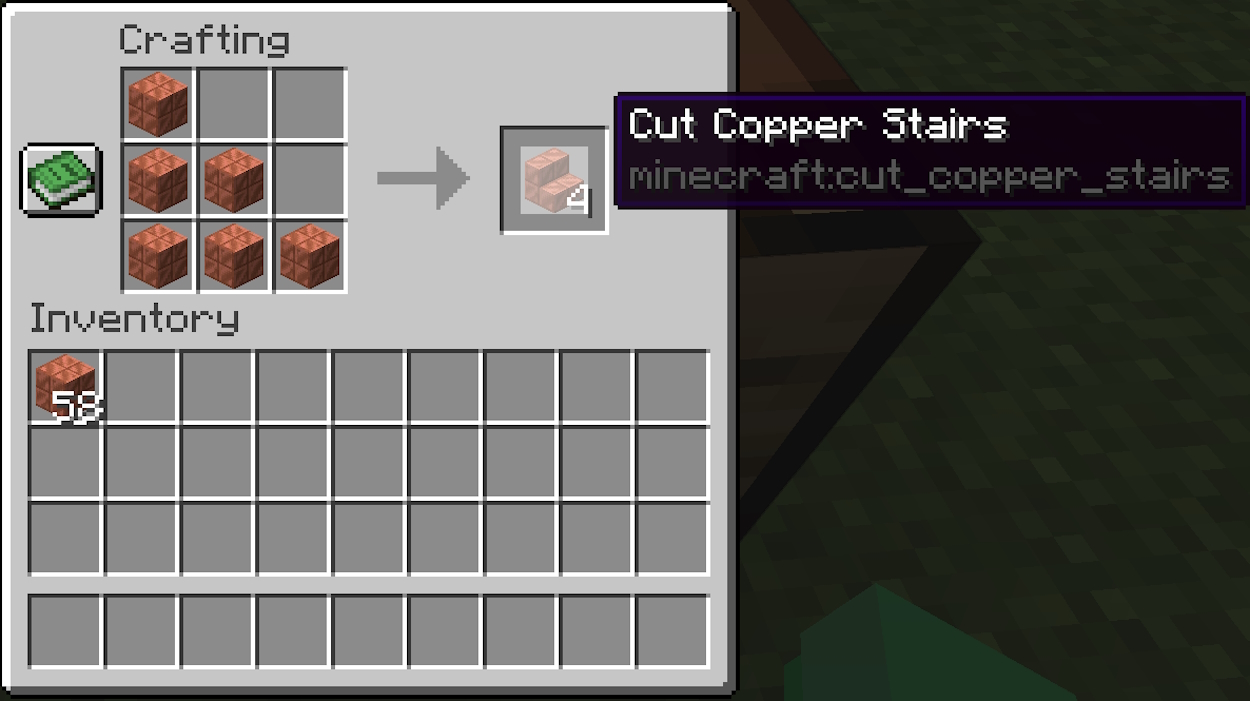
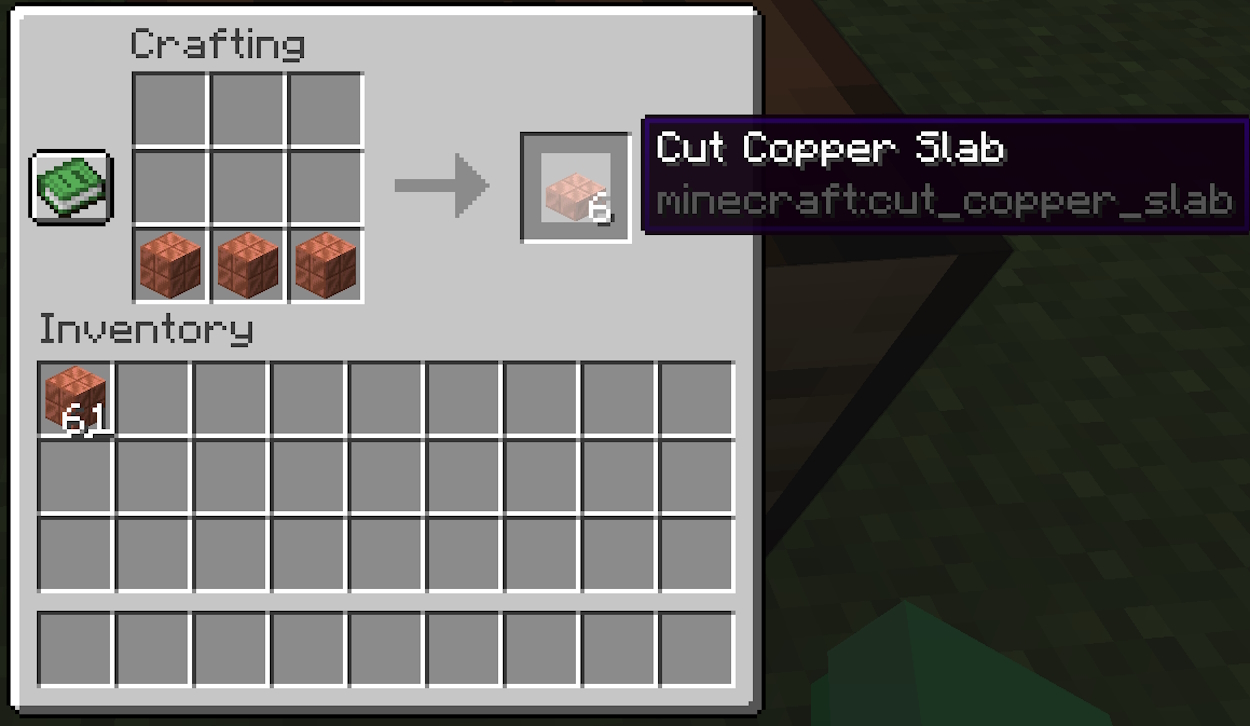
However, the more efficient way to create these blocks is with the Stonecutter . By placing a Copper Block or a Chopped Copper Block in the Stonecutter’s input slot, you can get a much better deal. So, feel free to follow our linked guide and make use of this surprisingly useful utility block. Also, keep in mind that these blocks cannot be made back into Copper Ingots.

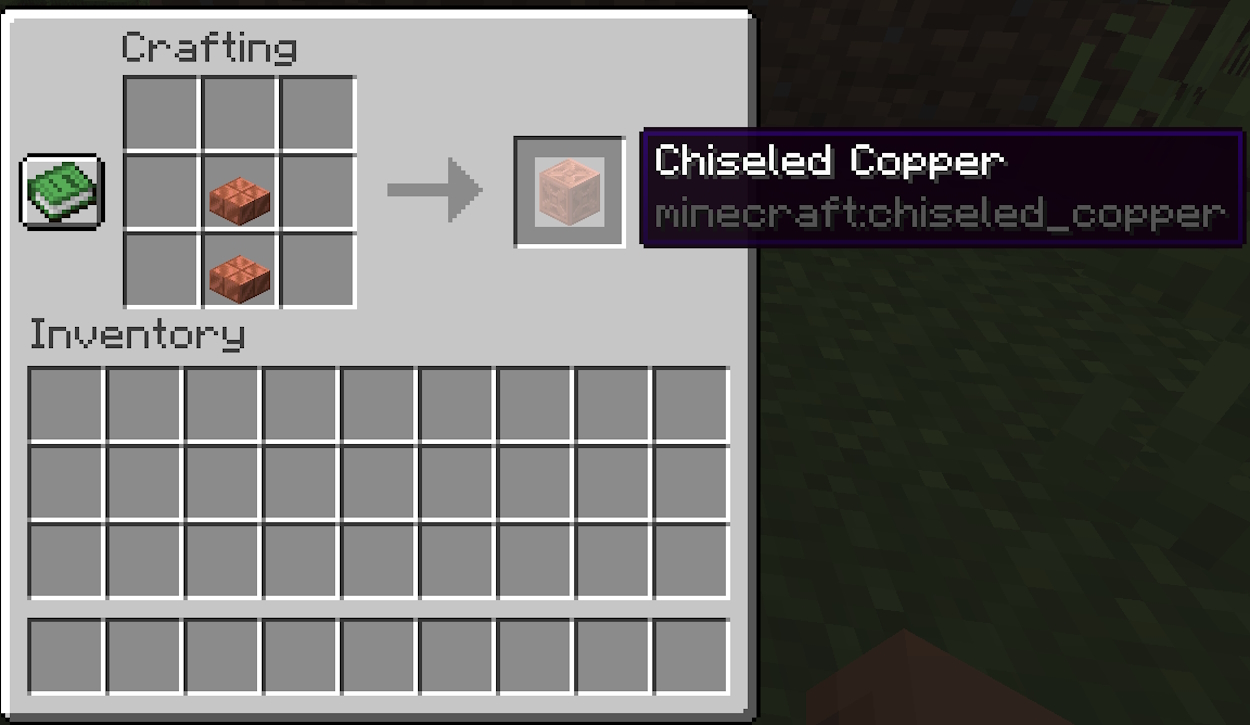
6. Chiseled Copper
Chiseled Copper is an attractive looking building copper block. It has a distinct “X” mark on the texture with a square in the middle. You can make it by joining two cut copper slabs vertically.
But it is better to use a stone cutter to make chiselled copper. Placing a block of copper inside a stone cutter will turn it into 4 chiselled copper as well as 8 chiselled copper slabs. So, the ratio is the same as crafting, but you will be wasting a lot of copper in making the chiselled copper slabs in the first place.
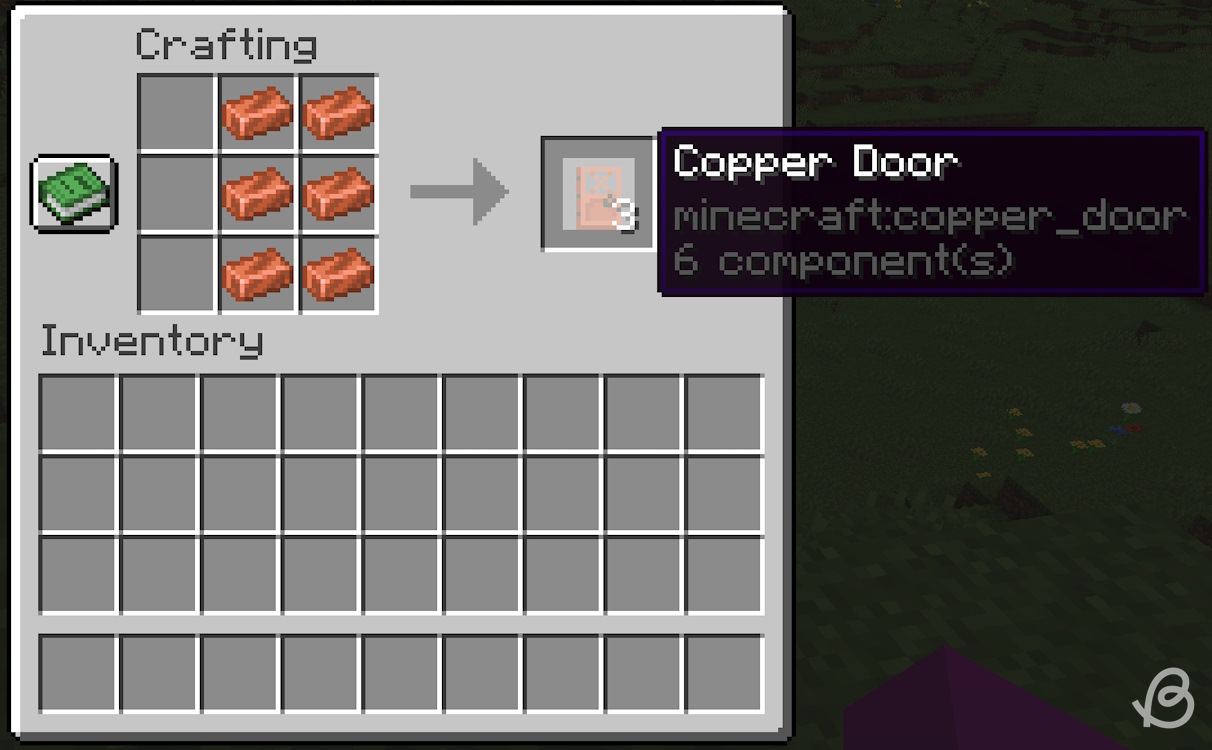
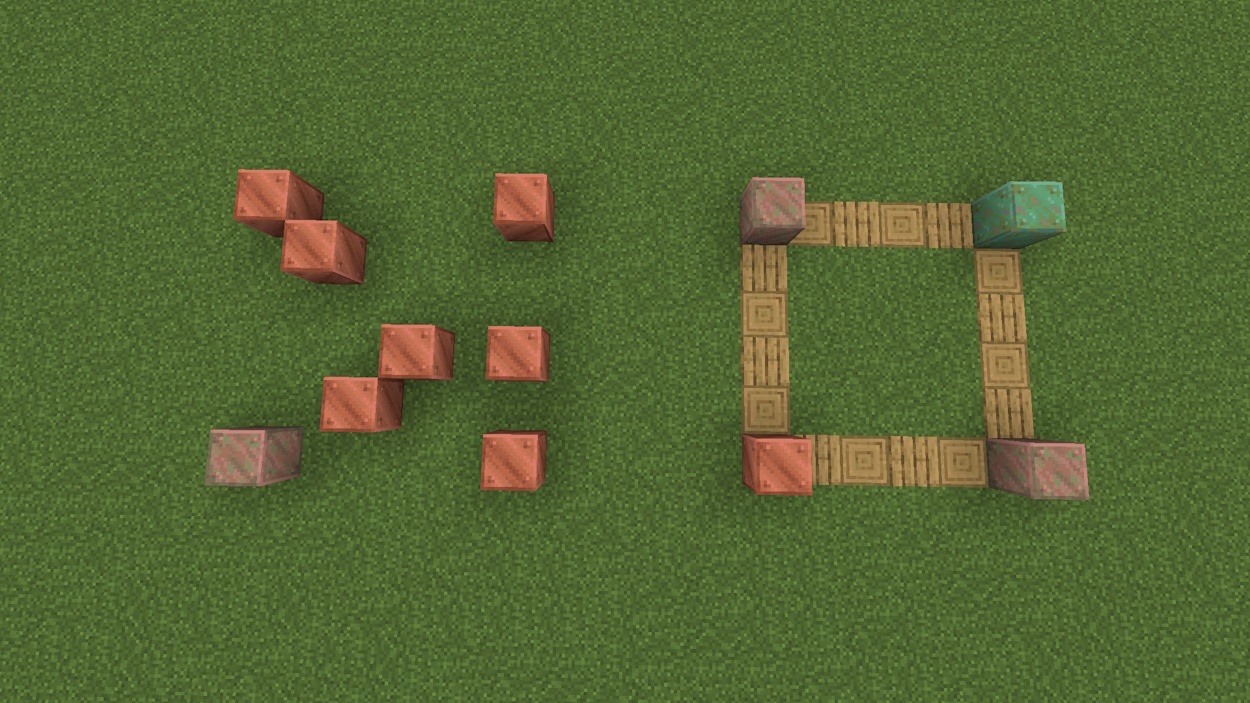
7. Copper Door and Trapdoor
Yes, you read that right. Copper doors and copper trap doors are present in the game. The upper part of the doors is transparent and features an “X” design. The lower part is chiseled and includes a giant door handle, making the doors great as entrances to player-created dungeon creations.
The trapdoor is similar to the upper part of a door , and the square part in the middle is also transparent. Although these blocks are technically made of metal, they do not behave like iron doors and trapdoors, but rather like simple wooden variants. This allows them to be easily opened and closed by right-clicking.
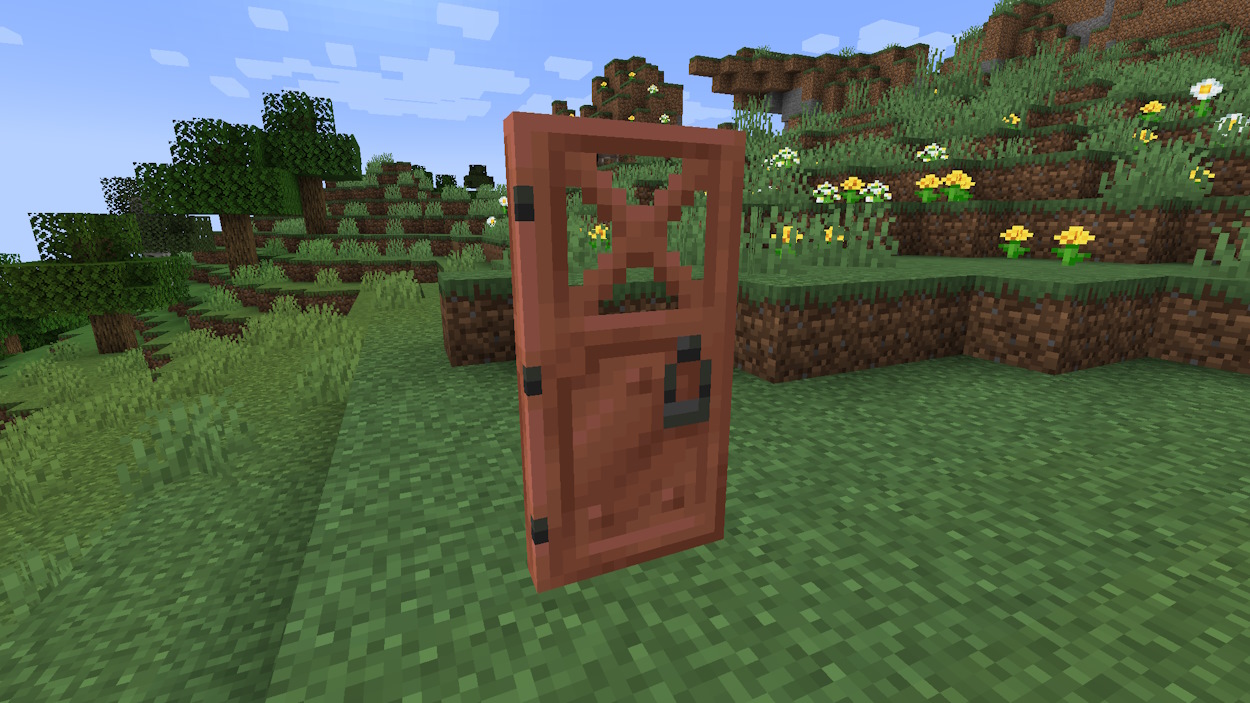
These blocks are crafted from copper ingots in the crafting table. As shown in the images below, fill two adjacent rows with copper ingots to create a trapdoor and fill two adjacent columns to create a door. Also, there is no way to create these two blocks in Stonecutter.
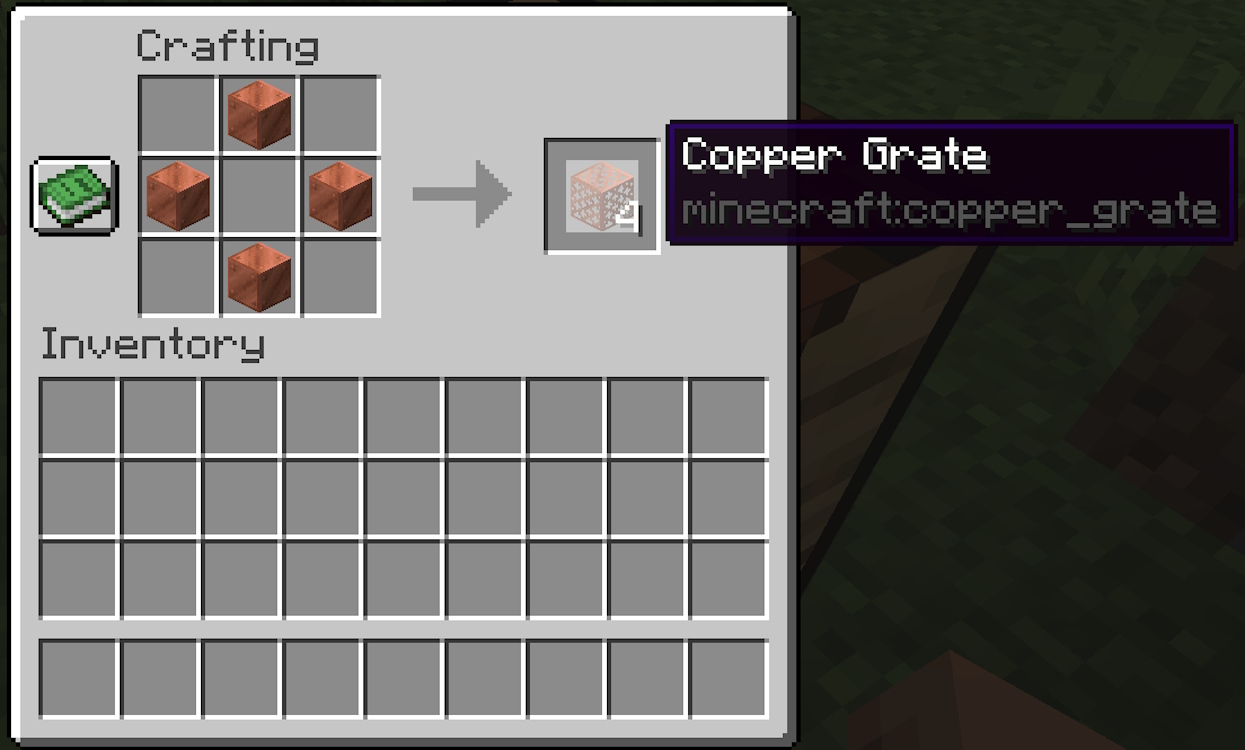
8. Copper mesh
Copper Grate is a transparent decorative copper block that behaves like a glass block . It is not a solid block, so mobs cannot suffocate in it, nor can hostile mobs spawn on top of it.
Moreover, the copper mesh has tiny holes in its texture, indicating that it allows light to pass through completely. Due to all these properties, grates are unable to conduct redstone power.

You can make four copper grates by placing four copper blocks in a diamond shape in a 3 x 3 crafting grid. But to stay on brand with almost all other copper blocks, it’s better to use the Stonecutter for this. It will only consume one copper block and provide you with 4 copper grate blocks in return.
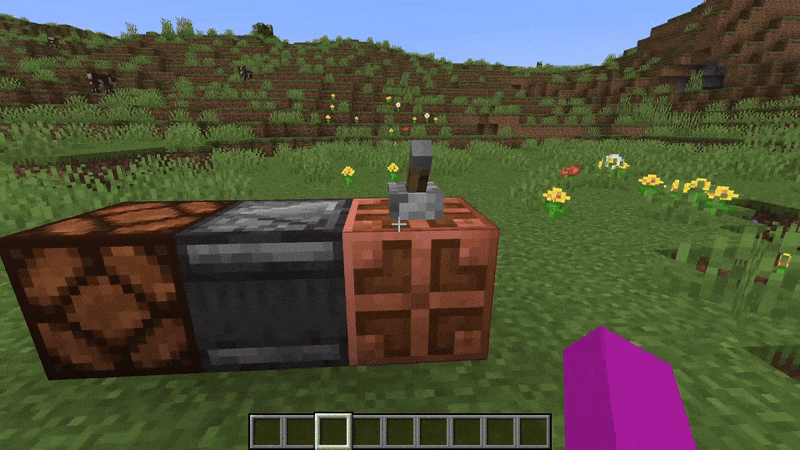
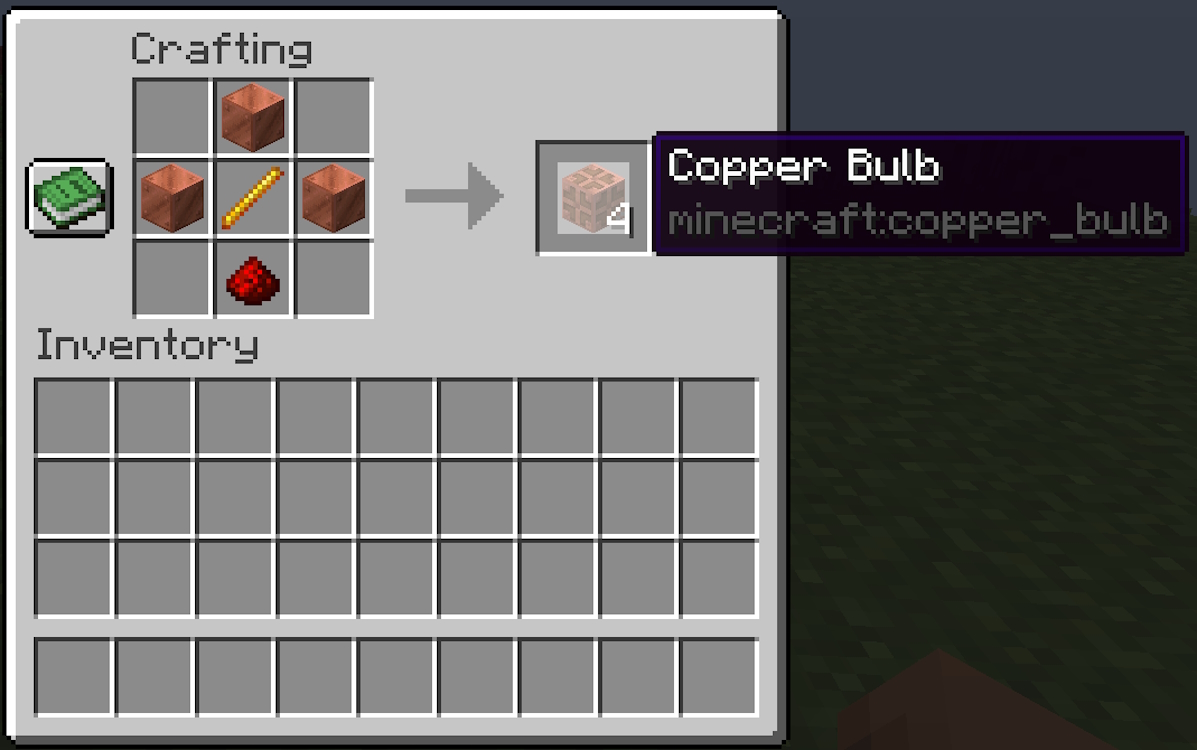
9. Copper Bulb
The Copper Bulb is one of the most special copper blocks from the Minecraft 1.21 update. It is not only a great looking building block, but also a redstone component and a light source block . It emits different light levels depending on the oxidation stage (explained below).
Also, you need electricity to turn the copper bulb on and off. So, placing a lever on top and turning it on will turn the bulb on. However, turning the lever off will not turn the bulb off, but turning it on again will.
When the bulb is receiving constant redstone power, it will display a red dot in the center of its texture. All state changes can be easily detected by an observer, which has a lot of game-changing uses in the redstone side of Minecraft.
You can craft a Copper Bulb using three Copper Blocks, one Blaze Rod, and one Redstone Dust. This recipe will yield at least four Copper Bulbs. Unfortunately, like the Copper Door and Trapdoor, there is no recipe for Copper Bulbs inside the Stonecutter, so our only option is to craft them.
How does the oxidation of copper blocks work?
The most striking feature of the copper block variants is the oxidation process. These blocks will slowly start changing from orange to green. There are four stages of oxidation for copper blocks:
- Stage 1: Copper Block (Regular Orange Copper Block)
- Stage 2: Bare Copper (has green spots but is still mostly orange)
- Third stage: Weathered copper (block that is already well oxidized and is more green than orange)
- Step 4: Oxidized Copper (oxidized block which is completely green)
Every type of copper block, including regular copper blocks, cut copper blocks, copper grates, chiseled copper, copper trapdoors, copper doors, and copper bulbs, all oxidize over time. Therefore, the four steps listed above apply to all of them.
Therefore, the copper block family is the largest in the entire game. Furthermore, the oxidation process is only determined by random ticking speed, just like other natural blocks such as plants and cactus .
In Java Edition, the oxidation of copper blocks is much slower when these blocks are grouped together. This is related to the technical way the game calculates the distance between these blocks. Placing copper blocks at least 4 blocks apart will speed up this process considerably.
So, if you are planning to use only fully oxidized copper blocks, then spreading non-oxidized blocks is the fastest way to make them green. Also, when the copper block reaches the final stage, it cannot oxidize further.
But, what if you don’t want the exposed copper block to oxidize and you want it to remain in its current state? Thankfully, this is very much possible thanks to wax.
Waxing and Corroding Copper in Minecraft
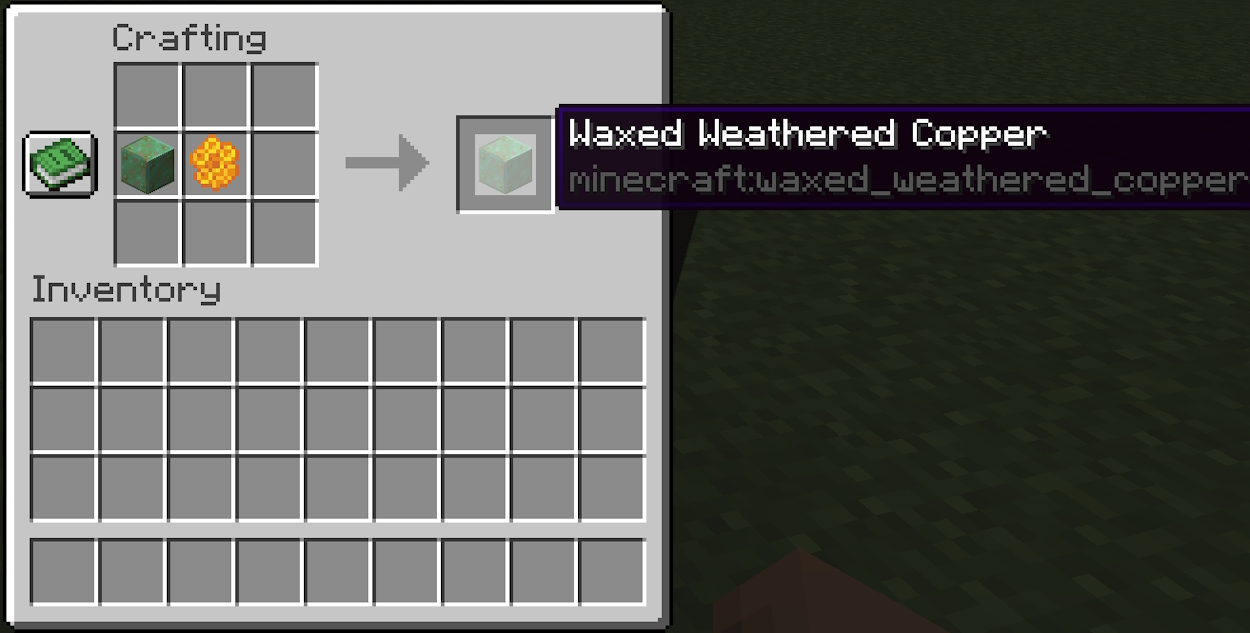
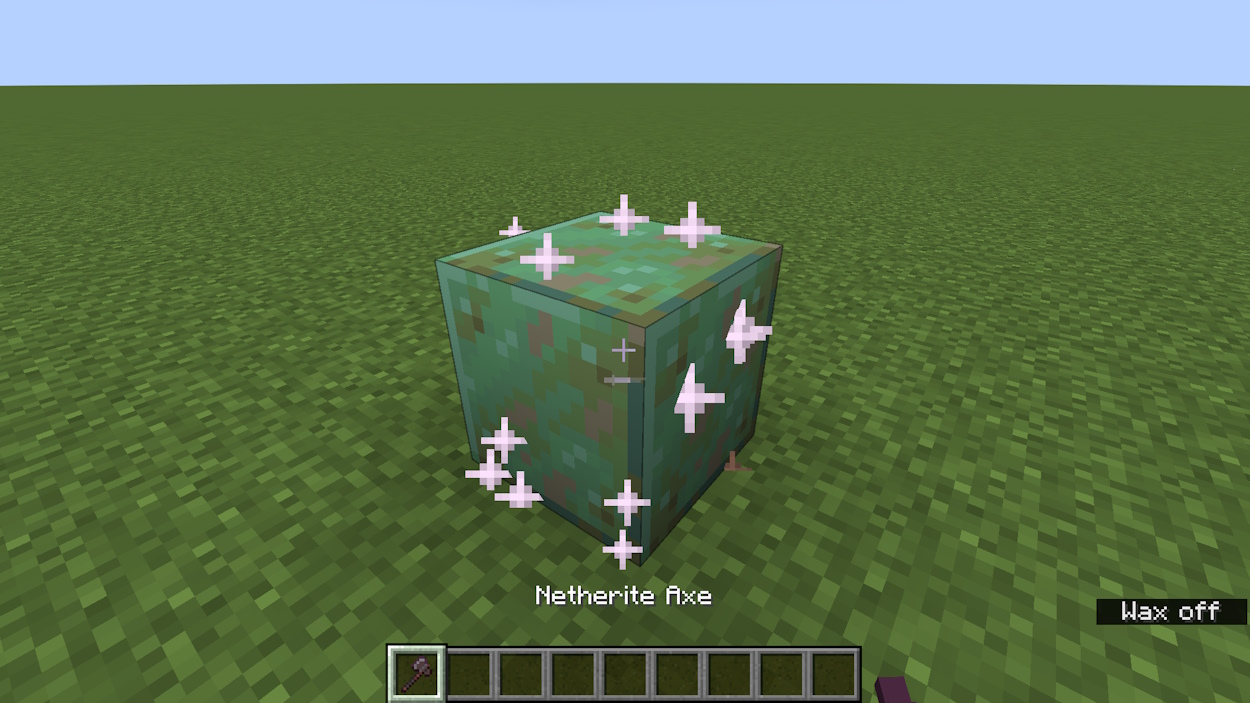
By right-clicking on any copper block that has Honeycomb selected, you can apply wax to it. This will prevent the copper block from oxidizing further, locking its stage completely.
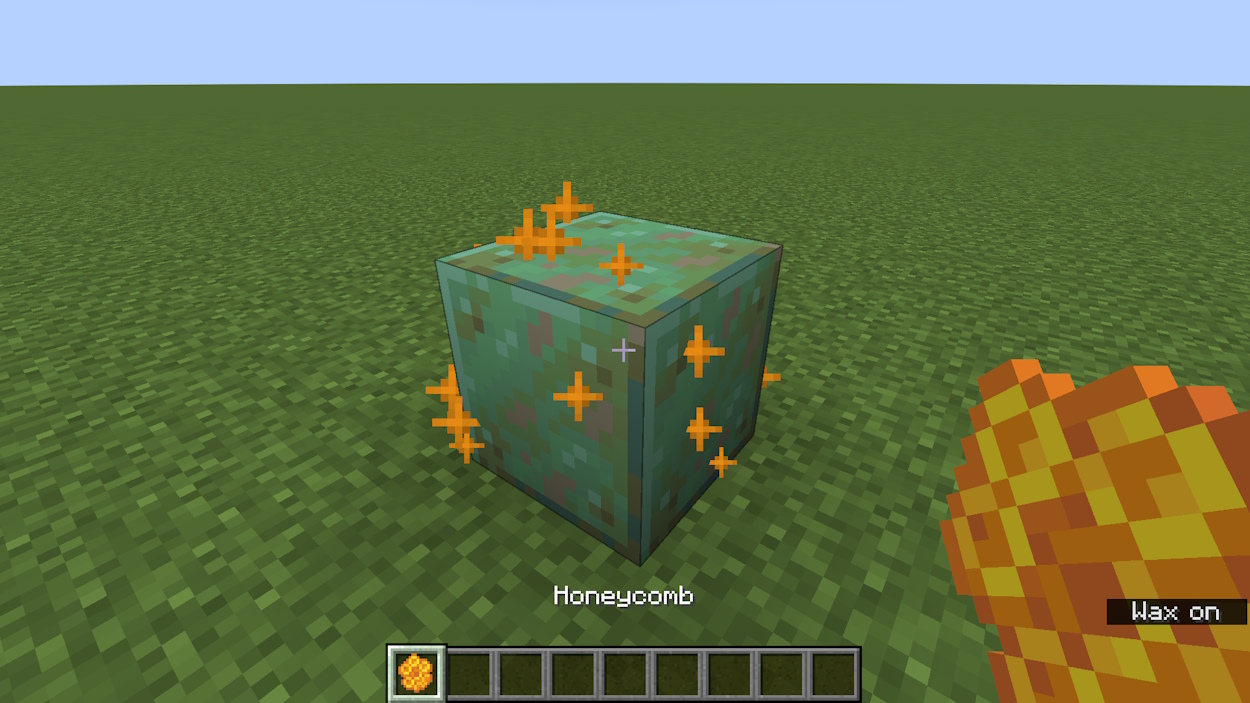
You can pick up the block by breaking it and its name will be updated with the “Waxed” prefix . You can also make a Waxed Copper block by combining a Copper block and Honeycomb on a crafting table. This will definitely save some time, especially if you are working on building a house with Waxed Copper.
On the other hand, what if you have an oxidized copper block and you want to use the first stage of that block? Well, this is where the scraping mechanics come in. If you right-click on a copper block with an axe, it will move back one stage, until it is on the first stage. Essentially, this allows you to get any stage with an axe and a fully oxidized copper block.
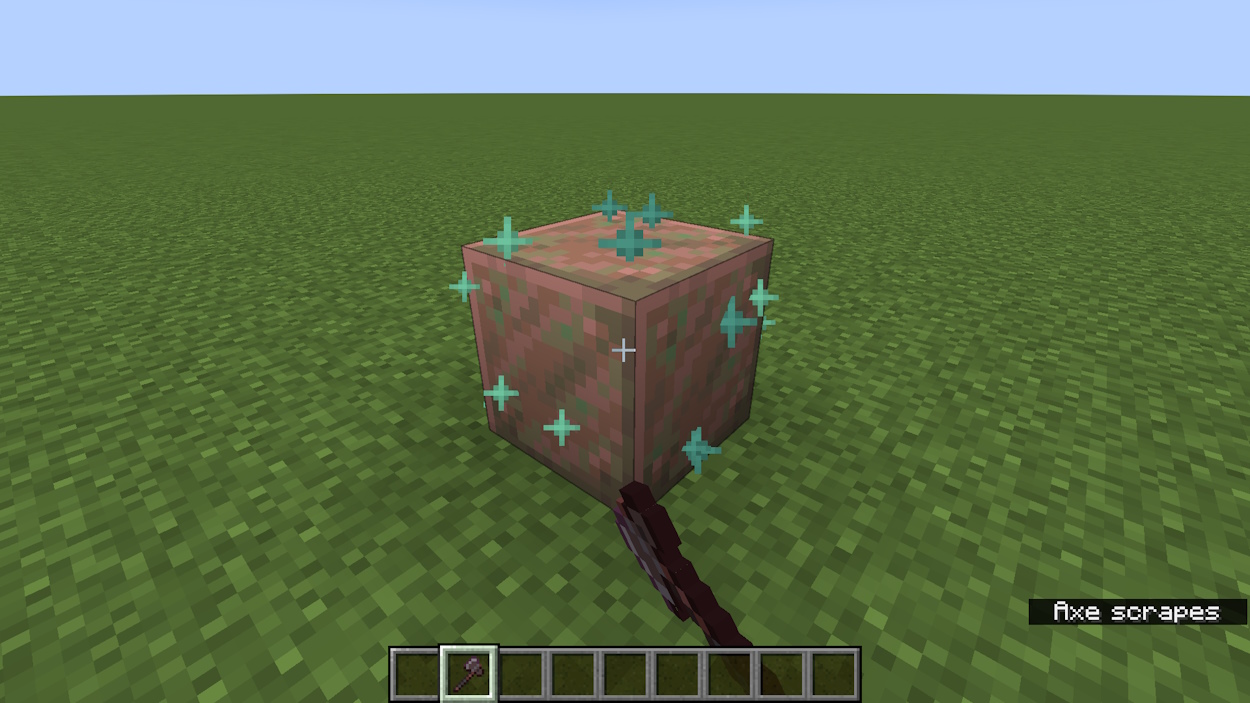
If wax was first applied to a copper block and then scraped off with an axe, the wax is removed instead of the copper block going back a stage. This way, you can continue aging a copper block even if you accidentally applied wax to it. Both applying and removing wax from copper will give you a different Minecraft advancement .
Additionally, if lightning strikes a non-waxed copper block in any of the last three stages, it will transition directly to the first stage. It also affects any non-waxed copper blocks nearby, causing them to deoxidize randomly.
Best Uses of Copper Items and Blocks
Now that you’ve learned the basics about copper, it’s time to move on to the functions of copper items and blocks. Copper ingots are part of several crafting recipes in the game. These include brushes , lightning rods, and spyglasses.
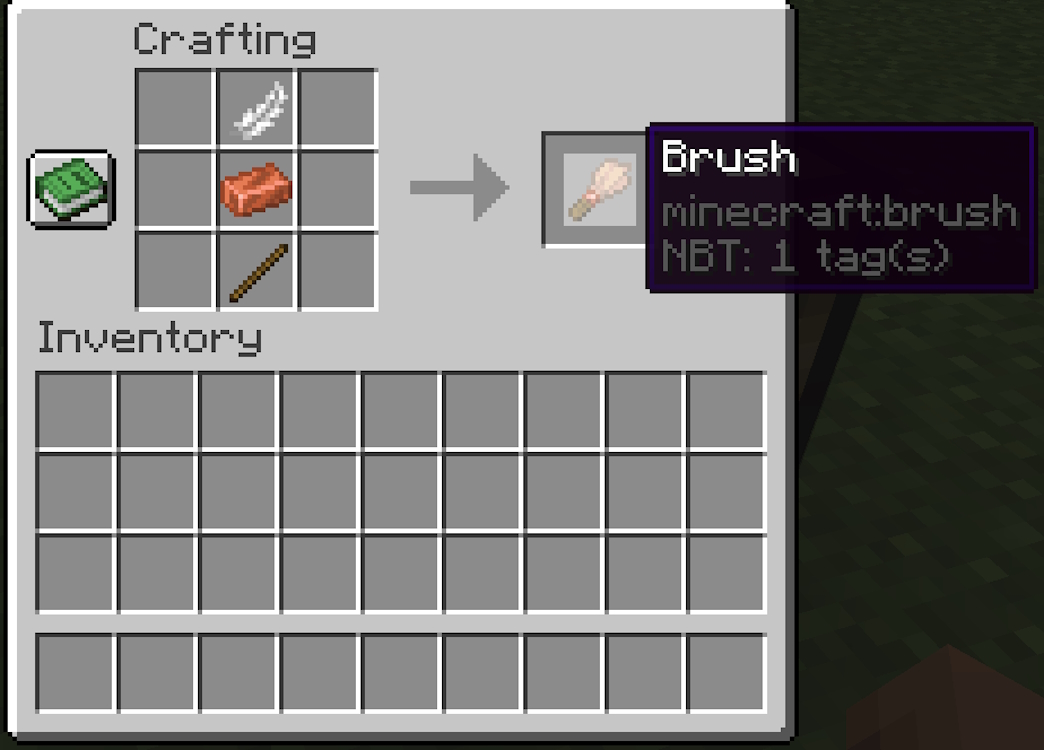
1. Create a brush
The Brush is an archeology tool that you can use to uncover hidden objects inside Suspicious Sand and Suspicious Gravel blocks.
To craft a brush you will need a copper ingot, a stick, and a feather. Place the feather in any slot in the top row of the crafting table. Then, place the copper ingot under the feather and the stick under the ingot. And your brush is ready.
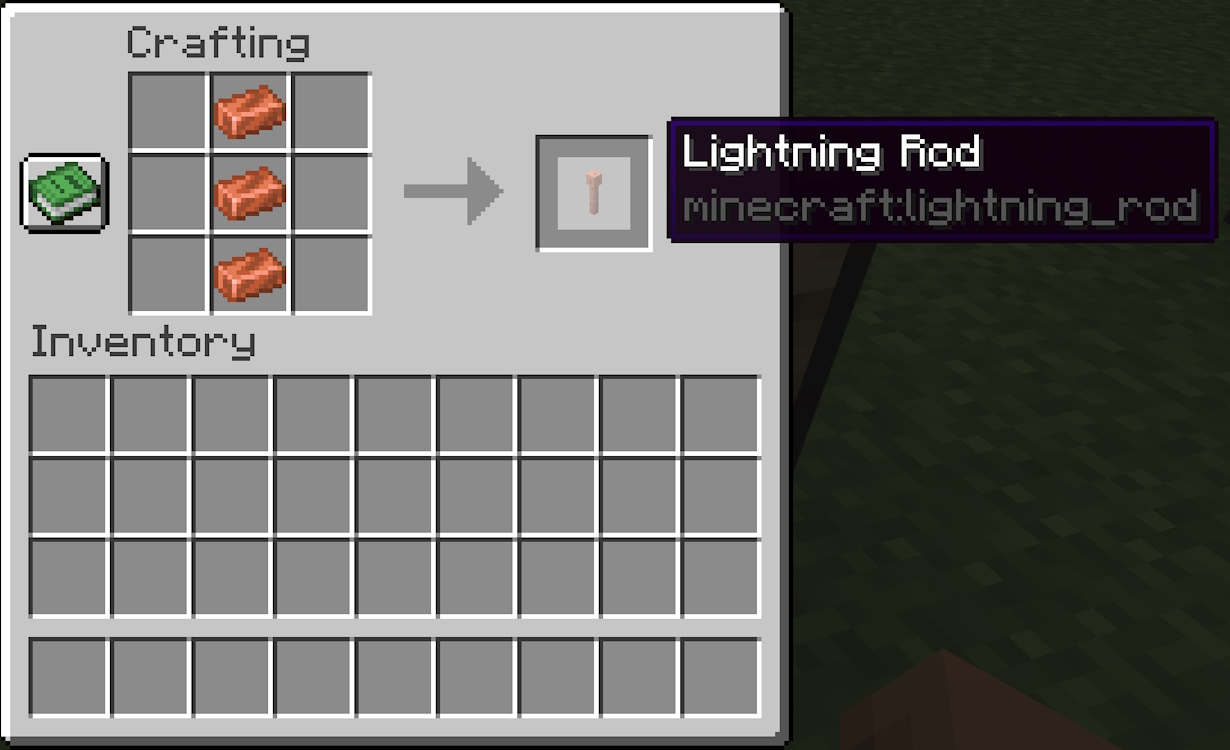
2. Make a lightning rod
The Lightning Rod is a block that attracts lightning strikes when placed in the Minecraft world. It will keep your builds, villagers, and old copper safe during thunderstorms in the game.
To create it, fill any column of the crafting grid with copper ingots, and you will be able to create a lightning rod.
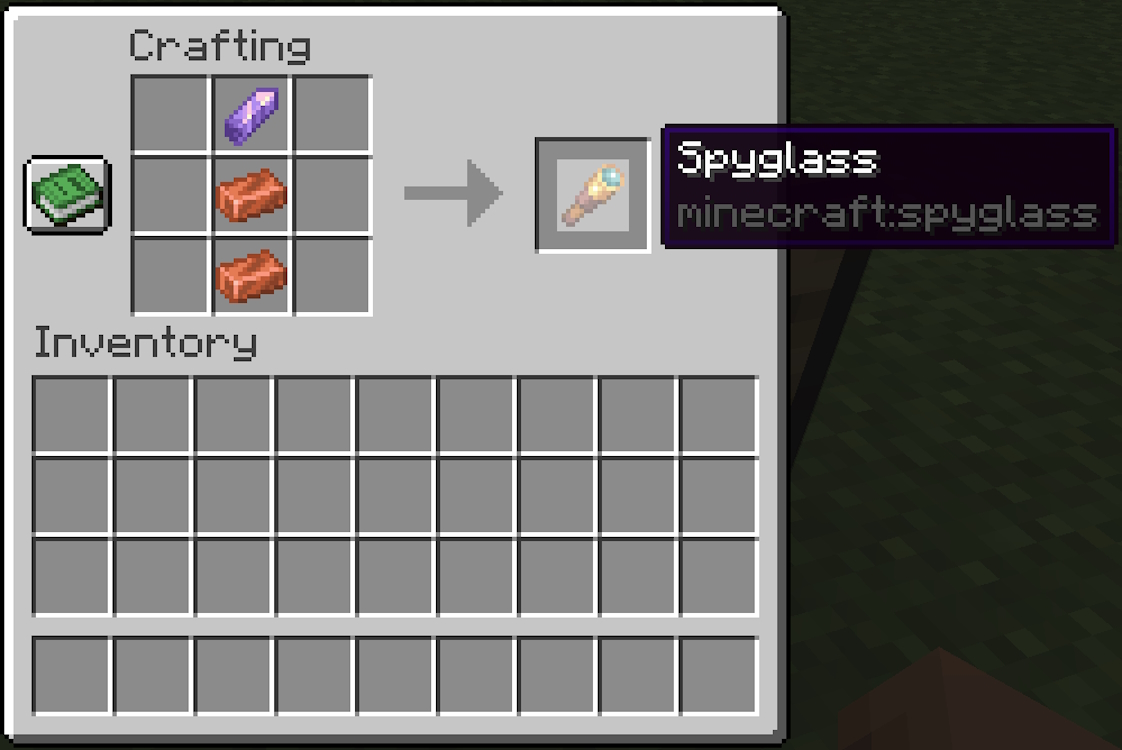
3. Make a spyglass
The spyglass is an item that players can hold and right-click to zoom in to see distant places. To craft it, place an amethyst shard in any slot of the top row of the crafting table’s grid. Then, place a copper ingot beneath the shard and another ingot beneath the first ingot.
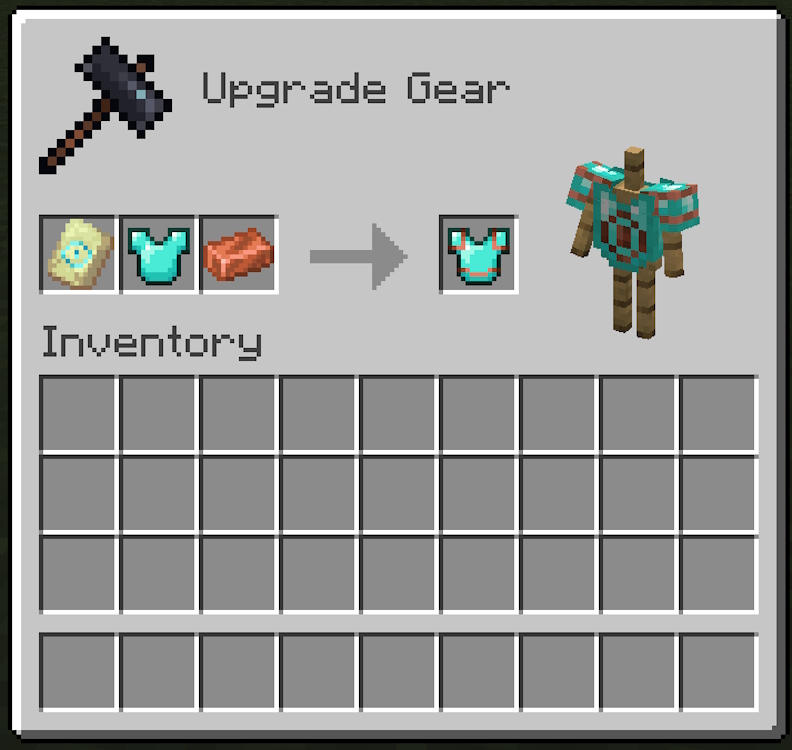
4. Used in armor trims
Copper Ingot is also used as a substitute for orange color when trimming your armor with the Smithing Table . Add a piece of armor, a Copper Ingot, and an armor trim of your choice to the mentioned utility block . You can see a preview of the trim and the chosen color on the right.
5. Light source
As we mentioned in the previous section, copper bulbs are also light emitting blocks in the game. The light level they emit depends on the stage of oxidation. For easy understanding, we have listed the exact values below:
- No oxidation (completely orange): light level 15
- Exposed version (mostly orange with green spots): light level 12
- Deteriorated copper bulbs (mostly green with orange spots): light level 8
- Oxidized copper bulb (solid green): light level 4

As you can see, the more oxidized a copper bulb is, the less light it will give. However, you can affect this by scraping the bulb and restoring it to its original brightness. To maintain its light level, you can apply honeycomb wax to the copper bulb.Related Articles
6. Build a better base
The main reason players spend so much time and resources collecting raw copper and then melting it down into ingots is so they can make copper blocks. Due to the oxidation mechanics, these blocks are more special than most other block families.
You can apply wax to the copper blocks so they retain their condition and color before using them in the build. Or, you can skip that process and watch your build slowly turn green over time, giving it a medieval vibe.
This can be a great reminder of how long you’ve been in that world. Plus, sometimes using all four steps can be the perfect solution for you. This way, you can create a super cool gradient, because these blocks were made with that in mind. The opportunities are endless with copper, so boredom isn’t an option.
And with that, you now know everything about Copper items, blocks, and mechanics. Thanks to the Minecraft 1.21 update, we got a lot of Copper blocks, making this block family one of the biggest, if not the biggest, in the game. So, which is your favorite Copper block? Did the oxidation feature surprise you? Let us know in the comments below!